An American in StoumontGame Analysis and Strategy Notes
|
Forward
Kampfgruppe Peiper CG1 focuses on the small Belgian town of Stoumont during the Battle of the Bulge. Over the course of the past few years I have chalked up five CG1 campaigns; three of those games have been on the American side with the other two being German (see one of those in review on Robert Delwood’s well-linked website). Overall I have clocked in a 4-1 record in the fight for Stoumont. At the conclusion of my third game as the American I decided that what I may or may not have learned would be of interest to other American commanders. You will find this write-up to be very much from the American perspective and for the benefit of the American commander. I intended it that way. Despite the published ROAR record, I and most all with whom I have discussed the game firmly believe the American have the much more difficult challenge. But it’s an exciting challenge that can be won. The battle for Stoumont is a very fun, topsy-turvy, and action packed game. Both sides have their opportunities at large-scale attack and defense with a collage of units from mighty King Tigers and fighter bombers to ammunition deprived paratroopers and wayward green half squads. Fighting day and night through three days in mist-enshrouded woods and villages, the Americans and Germans fight and strive for the upper hand. The following sections provide insight and recommendations regarding strategy, tactics, unit purchases, rules information, detailed defenses, and other notes that an American commander might find helpful in the battle. I am certainly interested in any comments, contradictions, or additional thoughts anyone might have. Good luck.
Sincerely,
Phillip M. Swanson
LegionKid@aol.com
Houston Texas
Table of Contents [top]
Introduction and the Map
Victory Conditions
German Initial Purchase
American Initial Purchase
American Initial Front Line Defense
General and Specific
Strategy and Tactics
Dirty Tricks
Favorite Hexes
Rules Notes
Wrap-Up & Summary
Appendix A: Stoumont City Defense Order of
Battle
Appendix B: Roua Core Defense Order of
Battle
Appendix C: Hill Defense Order of Battle
Introduction and the Map [top]
The figure below shows the Stoumont battlefield. The area in Blue is the American setup area and note that the sanitarium itself is not within that area. You must secure it during play. Also remember that your guns and at least fifteen squad/equivalents must set-up exclusive of buildings. The gray represents the German start line. Red arrows show traditional paths of attack in the initial scenario with the central five arrows being the most powerful. The map is dominated by the town of Stoumont and the attached village of Roua, the large forested hill in the north-central region, shallow streams cutting their way through ravines in the northwest, and the most important building on the map, the Sanitarium. Wooded areas in the southeast and southwest corners of the map should have little bearing on the game. If I could have made any recommendations regarding this map it would have been to cut half a dozen hexes from the eastern edge with another few from the bottom and have them added to the opposing edges.
Recommendations aside, there are no official errata out against the map albeit one minor item needs to be pointed out; hexside P28-Q29 does or does not contain barbed wire depending upon which mapsheet overlays the other. Barbed wire is of course good for the Americans. Whichever way you play it, have a look over the terrain and then read on to the following sections on victory conditions, purchases, strategies, ploys, and rules notes. The intent of this write up is to serve as a guide for the American preparing to defend Stoumont against the attack of Kampfgruppe Peiper and hopefully to provide insights that can lead to eventual American victory. The German is a tough nut to crack in this one. Good luck and hopefully you will find something here that will help you along.
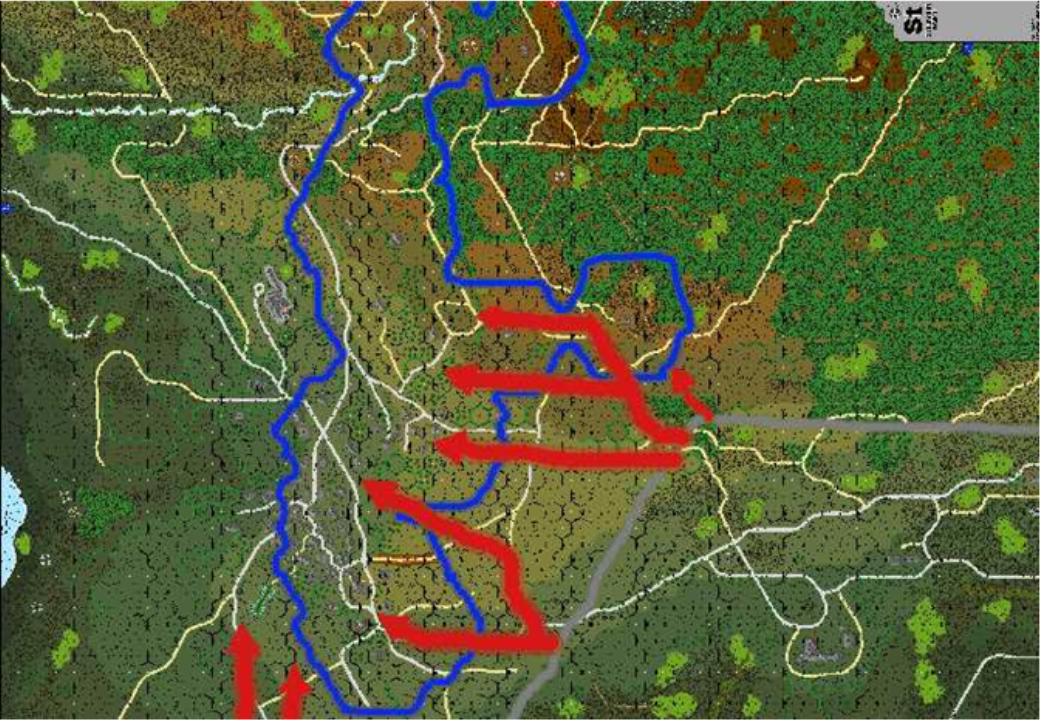
Figure-1 Clash at Stoumont: The Attack
(Click on image to expand it.)
Victory Conditions [top]
This is the most important set of paragraphs for any American commander to read. Give particular attention to the paragraph on personal morale checks (PMCs) and when you’ve finished give it yet another read for good measure. Now on with the show. Any potential Patton has got to have a good grasp on what it takes to win. And before I go into anything else I have to say that this isn’t easy for the good guys. The German elite start with a massive force of the best Germany has to offer. At sundown on the first day they will be in control of most of the map; but hopefully not the whole map and hopefully at a painful cost. Here is the truth: the Americans must (1) have accumulated 130 Location Victory Points (LVPs) at any scenario finish, or (2) they must control all three of the widely-separated Sanitarium, St. Hubert’s Church, and Ste. Anne Chapel at game end. Here is the way the projected numbers break down:
|
RESULT |
19AM |
19PM |
19N |
20AM |
20PM |
20N |
21AM |
21PM |
TOTAL |
|
Gloomy |
22 |
0 |
0 |
0 |
1 |
3 |
18 |
24 |
68 |
|
Hoping |
23 |
1 |
0 |
0 |
3 |
4 |
24 |
26 |
81 |
|
Average |
24 |
2 |
0 |
1 |
3 |
24 |
26 |
30 |
110 |
|
Promising |
25 |
3 |
2 |
2 |
24 |
24 |
26 |
32 |
138 |
|
Smashing |
26 |
3 |
3 |
14 |
26 |
28 |
34 |
52 |
186 |
|
German Chit |
N/A |
A |
A |
- |
- |
A |
- |
- |
3 |
|
Ami Chit |
N/A |
- |
? |
? |
A |
A |
? |
A |
5 |
Table-1: American Accumulation of Location Victory Points (LVPs): 130 Needed for Victory
The above table depicts average and competent play on both sides leaving the American short of victory. I have also listed the projected usage of attack chits; there will be more on that later. The biggest challenge for the American commander is to find ways to elevate the American position from ‘Average’ to ‘Promising’. Subsequent sections of this write-up attempt to provide insights into purchases, defenses, and strategies and tactics that will enable the American to do just that. But before skipping to those subjects, there are still some very important points to make about the victory conditions.
All of the above cases factor in the Americans occupying and holding the sanitarium on the first scenario (19AM). Most American commanders should be able to accomplish this but failing to do so can quickly put one on a fast track to a gloomy finish. A quick inspection shows that somewhere during the PM turn, the Germans invariably conquer the Sanitarium. In this first-day afternoon scenario the sanitarium becomes something akin to the Alamo, surrounded and without hope of rescue or reinforcement. In the most powerful game I have played as the Americans, after killing 13 German tanks and a slew of supporting elements and infantry in the AM turn, the sanitarium still fell in the PM turn. At this stage of the game, the Germans are still going to be just too powerful. Do not sacrifice the major part of your remaining army for a sanitarium that is going to fall anyway. What’s important is the units that survive and when you take the sanitarium back.
Again looking at the table above, you will note that the most important single factor in accumulating the needed victory points is the date on which the sanitarium is retaken. 20PM is desirable but difficult and 20N can still get you where you need to go. The Germans have spent the first three scenarios exterminating Americans and it takes time to rebuild an army capable of marching across the open and ejecting well-armed and potentially fanatic SS Infantry from stone buildings, especially given the amount of armor the German has at his disposal. It's difficult but certainly not unobtainable. Strategies and tactics for accomplishing this will be discussed in subsequent sections.
One final note about the victory conditions, maybe the most important note. The most common cause of American defeat is the American commander failing a premature personal morale check (PMC). The German onslaught seems so overwhelming and the American position progressively begins to seem so tenuous.
Many American commanders lose sight of any hope whatsoever and defeatist talk from your opponent helps cast a darkening cloud. The means to victory just can’t be seen. But believe me it’s there. Even if you fall behind on the chart in Table-1, it’s there. The best thing you can do for yourself is just put on a stoic face when disaster occurs or as the bottom seems to be falling out. Put on the mentality of a Churchill. One example but not the only one to communicate the point: in my last American game and despite my attrition of the Germans it looked like I was going to fall short of taking the sanitarium on 20PM. I was falling into the repeatable trap of, “If I don’t take it now, I don’t see how I can win. The German’s still seem so strong and they still control most of the map and all of the Major buildings. And I’m running out of time!” I was helped in passing this personal morale check when I was fortunate enough to survive fire from upstairs and squeeze a couple of half squads and a leader past a Panther into the sanitarium before the sun set. But the point is NOT that I succeeded in taking most of the sanitarium that turn. The point is that over the course of the next few scenarios German attrition quietly turned the perceived German monolith into a paper tiger. It snuck up on me. In the end and in the last scenario, I possessed such a surprising advantage overall that I was able to fracture the remaining resistance and cascade across the rest of the board. I got all the points I would have needed, and the buildings necessary for automatic victory to boot! Had someone told me this would happen earlier I would have scoffed. And had I failed that earlier personal morale check I would have lost a game that in the end turned out to be an overwhelming American Victory. Just to push the point a bit further, I failed a PMC in a previous game as the Americans and lost a game that in hindsight was a potential win if only I could have seen it. This happens all too often if you talk around, especially in the 19N, 20AM, and 20PM scenarios. The Churchill mentality is critically important in this game.
In summary, hold the sanitarium on the first campaign date while attriting the German and then focus on the means to retake the sanitarium thereafter. Look at LVPs on the Eastern half of the board if they can be had at some point and don't discount Automatic Victory Conditions, it may in fact be how you win in the end. With that I will leave the discussion on victory conditions and move on to the things that will help get you there.
German Initial Purchase [top]
This discussion on German purchases comes up front so the American knows what he is up against. The Germans start off with a given force of 16 Tanks, 15 half tracks, and 12 squads. This armored force is easily strong enough for the first day of battle in Stoumont and what the Germans really need is more infantry. Thus don't be surprised when the German commander starts buying infantry fast and furious. Below is what I would purchase as the German commander:
|
UNIT |
QUANTITY |
COST (ea) |
TOTAL |
|
SS Infantry Platoon |
2 (CG Date Max) |
9 |
18 |
|
SS PzGr Platoon |
2 (CG Date Max) |
12 |
24 |
|
SS Engineering Platoon |
1 (last available) |
14 |
14 |
|
Paratroop Infantry Platoon |
2 |
5 |
10 |
|
FlaKPz IV/20 Whirblewinds |
1 (last available) |
8 |
8 |
|
Flam HT Section |
1 (last available) |
7 |
7 |
|
Sniper |
1 (CG Date Max) |
2 |
2 |
|
Kfz Kublewagons |
1 (last available) |
1 |
1 |
|
85 Points Available |
- |
- |
84 (Save One) |
Table-2: German Projected Initial Scenario Purchases (85 Purchase Points)
The list shows maximum infantry minus one para platoon that can be had. The Whirblewinds are anticipated because they are the only effective German AA weapon available and will most probably be purchased here in the AM to prepare for the destructive appearance of American fighter-bombers in the PM turn. They will also be useful throughout the game
vs. American infantry and the American should expect to see them, from a distance that is. The Flame half-tracks are best in the attack and are useful against Americans in stone buildings so expect them too. The
kublewagons are effective and annoying scout weapons especially when MG equipped. So there you have it in total, 16 Tanks, 23 half tracks of various capability, some Whirblewinds, some scout cars, 33 Infantry, and probably 10 leaders.
Oh, and the King Tigers... you should hope that the German buys them in the beginning rather than later. They are not needed for the attack, stay in motion constantly just to keep up, risk startup immobilization or otherwise in what will become the rear area, are nice juicy targets for the PM fighter bombers, and take money away from what is really needed. Hope the German buys them at start rather than waiting to plop them down intact at the sanitarium where they will be most effective and where you least want to see them.
American Initial Purchase [top]
With the given on-board force and only 25 points to spend, this is where the Americans can make their first big mistake. So putting things in perspective is important. What are the goals? The goals in descending order are:
prevent capture of the sanitarium on 19AM,
bloody the Germans and start the attrition process,
live to fight another day,
get good position for the following PM scenario, and
hold on to whatever minor LVPs you can.
So what purchase most helps you do that? I am going to say right up front that the following purchase list is the most productive:
|
Unit |
Quantity |
Cost (ea) |
Total Cost |
|
Infantry Platoon |
1 |
7 |
7 |
|
AT Pltn I [57L Guns] |
1 |
10 |
10 |
|
Fortifications |
5 |
1 |
5 |
|
Sniper (see Option-[D] below) |
1 |
3 |
3 |
|
- |
- |
- |
25 |
Table-3: Recommended American Initial Scenario Purchase (25 Purchase Points)
Here are my reasons. First, all five fortifications will be needed for just about any defense you come up with so there are really only 20 points to spend. Second, the Germans are coming at you with roughly 40 vehicles and this is your best chance to take some of them out. Go for the 57Ls for ‘multiple’ reasons. Third, you’re going to need additional infantry and this is what you can afford. If you’re thinking about buying all infantry consider the German combined arms coming at you and put the pieces down and play with them, you’ll see what I mean. Fourth, there will never be another turn with this many German attack and morale die rolls. Take advantage of it; buy the sniper and kill the German leaders and whatever else you can manage. I think these purchases are a good and effective balance that will do more toward the above goals than any other combination.
And the other options:
-
I really enjoyed purchasing the Engineers in one game. The flamethrower is a good anti-tank weapon and a good weapon in general. Doyle Motes employed a single HIP flame throwing HS to stop an entire armored column in one of our games. The DCs can be hard to use but it would be fun watching a half squad in the steeple dropping one down on the bad guys two floors below; if only the Germans would cooperate. But those Engineers cost 12 points, tempting for sure but not really worth the three anti-tank guns and the sniper you would have to throw away.
-
HMG Platoon. Again 12 points. Ouch. Prior to the second edition the fire lane rules were different and these MGs were a competitive option. Not any more. Don’t buy them in the initial scenario. The MGs will just get captured and then used against you.
-
Artillery. The Germans move quickly and don’t stay put, you can’t see squat, and by the time you can see something and try to grab the radio, the Germans are on top of you. Buy something tangible, save the artillery for later. And on that point, don’t voluntarily eliminate three of your half squads and their 60 mm mortars as the rules allow per the American ordnance note. They won’t cause a commensurate amount of damage for their loss and the same point above will apply. Those units are needed on the board. There are some really good mortar positions, take advantage of them.
-
There are a couple of other considerations worth the thought. Fighter-bombers, jeeps, and believe it or not trucks. If you bought the 57Ls you already have the potential bonus of some extra 50. cals from the Jeeps. At a cost of only two points and a gamble you might want to purchase more jeeps somewhere down the road but not now. 1-1/2 ton trucks are good at blocking city streets and forest roads and only cost a point (see Blocking Traffic in General and Specific Strategy and Tactics). The fighter-bombers are sooo tempting. In the PM turn you have just got to buy the one allowed being that they are only two points, the weather will be relatively clear, and they can legitimately destroy Panthers or anything else. But what if you bought one in the AM as well? Two flights and up to six Fighter-Bombers would be a god-send. Trading three points of Sniper for three points of fighter bombers and trucks to block the road is certainly an option but I’ll stick with my recommended purchase of the sniper for now. It's a tough call.
Regarding the purchase of fortifications for this game, roadblocks are as valuable as it gets. Put them in key positions and look at the Appendices if you want to know what I mean. Next in value comes AT mines and dummies. I generally don’t use question marks for dummies in campaign games simply because over the course of time things happen, stacks get knocked, the wrong unit gets picked up, and mistakes get made. Dummies are exposed as dummies before they get to be dummies. I use regular infantry counters and support weapons and generally mark them on the back in pencil, use elite counters (if it doesn’t confuse things), or mark them on a side note or whatever. Disguise your dummies. It’s definitely worth the effort to keep them legit so that they aren’t purchased in vain.
One final note because I haven’t said anything about American armor. The Stuart is the American’s friend. Shermans are large easy targets, the armor factor difference is irrelevant, and you’ll find them burning more often than not. The +2 to-hit DRM between the two is the difference between death and survival in a map canvassed with Panthers and
panzerfausts. The Americans need things and things that can survive from campaign date to campaign date. The Stuarts are off-limits in the initial scenario but when it comes time for the counterattack, buy them. The tank destroyers are also good but keep in mind they can’t fire if buttoned up. I’ll touch on a few other purchase related things in other sections but next stop is the American defensive setup on 19AM.
American Initial Front Line Defense [top]
I have put detailed information on several defenses into the appendices. I recommend pulling out the map and playing with the units, shuffling them around in the different defenses so you can evaluate them first hand. The defenses are:
The Stoumont Defense,
The Roua City Core Defense, and
The Hill Defense.
The Roua and Hill defenses are the ones that will be the most effective with respect to the goals described in
Victory Conditions (I personally prefer the Hill Defense). The Stoumont Defense was shown for completeness and I don’t recommend playing it. The following table describes the force allocations for each defense on a percentage basis relative to where those forces are actually deployed on the map:
|
Defense\Position |
Defending Stoumont |
Defending Roua |
Defending the Hill |
Rear |
|
50% |
35% |
5% |
10% |
|
|
B: Roua Defense |
25% |
50% |
15% |
10% |
|
C: Hill Defense |
15% |
35% |
40% |
10% |
Table-4: American Defense Options and Disposition of Forces (See Appendices)
I’ll try to keep the discussion short and to the point. The Roua City Core Defense detailed in Appendix B is solid. It’s the one I used to slaughter 13 German Tanks and a slew of supporting infantry. But it is best against the direct attack and is susceptible to surgical enemy thrusts just to the north and underneath just south. Most of you know ASL players that are handy with the scalpel and that would do just such a thing (one Dirk Walker comes to mind). The flanking units have been positioned to blunt the surgeon’s knife but they don’t offer total immunity from such an attack.
The Hill Defense defined in Appendix C on the other hand puts a lot of Americans up on the high ground and in the woods where they would most like to be. This American position on the high ground is difficult to assault, has secure wooded route paths, and allows for a good volume of flanking fire on the German right wing trying to strike upon well-defended Roua. The German simply cannot allow you to hold these hill positions especially given their central access to so many strategic LVPs. The Hill Defense also should prevent even the most surgical player from handing your defense to you on a platter. And if you’re looking at the map in Appendix C, the American Objective Hexes (green stars) aren’t where they are by accident. They are a lot of what you are defending and ownership provides a good jumping off point to capture major LVPs farther along in the game.
Alternatively, don’t play the Stoumont Defense shown in Appendix-A. After a short feeling of strength you’ll find your force surrounded and destroyed. That will do nothing to further the goals described earlier.
Having described the defenses, I thought I might throw out a slight variant that can be applied commonly across each for those players who always have an eye to the rear. Moving a couple/few guns to rear positions in the vicinity of La Rochelle can put more teeth into the PM defense when it comes time for that. Doing this robs your initial defense of some stopping power and ambush potential. I myself generally allocate only one 57L gun for this (see appendices) and rely on survivors, purchases, and the Medium Tank Platoon for PM defense. Anyway, if you do decide to do this, just be sure that each rear gun is within three hexes of where you would want it in the PM or that it can be hooked up to a Jeep/Tractor before the AM ends. I mention this only as a note. The Appendix B and C defenses as written will serve you well.
One other note, when looking at the Appendices you should be aware that I showed a representative and average ‘pull’. Thus you will see green units and elite units that you yourself may not actually get depending on your luck. And I only pulled five leaders to be conservative. In conclusion I recommend choosing the Roua defense or my favorite, the Hill defense, depending on whom it is you are up against. Playing with the pieces and defenses should give you a feel for it so I’ll go on to strategies and tactics.
General and Specific Strategy and Tactics [top]
I'll start off with some generalized comments and then break out specific strategies and tactics that hopefully will help. Aside from defending the Sanitarium, the American defense on the initial scenario exists to bloody the Germans. I have heard about players thinking that retreating the whole American force out of harms way is a good idea. NOT. Throwing away the best opportunity from good defensive positions to attrition the German ensures an intact Kampfgruppe Peiper that can stop any planned American counterattack. It is a bad idea bar none that will probably also lead to German early capture of the Sanitarium . You must attrition the German to win this game. Utilize the defense to hold off the infantry, force the German to apply his armored assets and get in close to break you, use APCR/APDS and White Phosphorous liberally, surprise him with side shots from hidden guns and concealed Bazookas, and look for immobilization opportunities when you can. If you manage to break a German squad, give it more attention rather than less. Get the death; the German will always be hurting for infantry and he knows how painful each loss is with such a limited infantry force-pool. Good luck killing things and tangling up the German advance; it’s what the 19AM defense is all about. Now onto something more specific.
Lines of Defense
Every American defense has a strong contingent centered on Roua. This is your first line of defense and it will speak for itself. I’ll address any units up on the hill in the Bois de Bassenge later. Once the initial American positions in the Roua first line of defense are breached decisively, there really isn't another good defensive position until you get back to the high ground around La Rochelle. With the amount of German armor, any line out in the open is doomed to failure. The second line around La Rochelle is probably where the most bitter fighting in 19PM will occur. Behind that is the final defensive positions along the river line and anchored by the critical Trou du Ruy House at RR23. This is where the most bitter fighting in 19N will probably be. If you can hold one of those lines to the conclusion of 19N then you will be in good shape for the counter attack. Being kicked off the map entirely or doing so voluntarily is a bad thing. Now why these three lines? Why am I not recommending a line in the western woods protecting the entry area at GG1? I’ll start by explaining a very realistic possibility. Imagine a German Roadblock from the Trou du Ruy to the woods in SS25. Imagine a German five factor AT mine in OO21. Imagine German Panthers, guns, and infantry on the high ground surrounding the resulting entry area pocket. Imagine artillery zeroed in on the resulting entry area. Imagine trying to bring in the infantry-deficient Task Force Jordan under those circumstances. Imagine a forest fire of burning American vehicles. You need Task Force Jordan to win. Task Force Harrison over in the west on the other hand has scads of infantry and they enter in wooded areas and even if the Germans control the entire entry area (hopefully not but even so), you will still gain entry and be successful in pushing somewhat forward toward the Sanitarium. You’ll need the units of Task Force Jordan for the critical push. The lines of defense I advocate here give good locality to some LVPs, take advantage of good defensive terrain, and enable the forces of Task Force Jordan to be brought to bear without slaughter or delay.
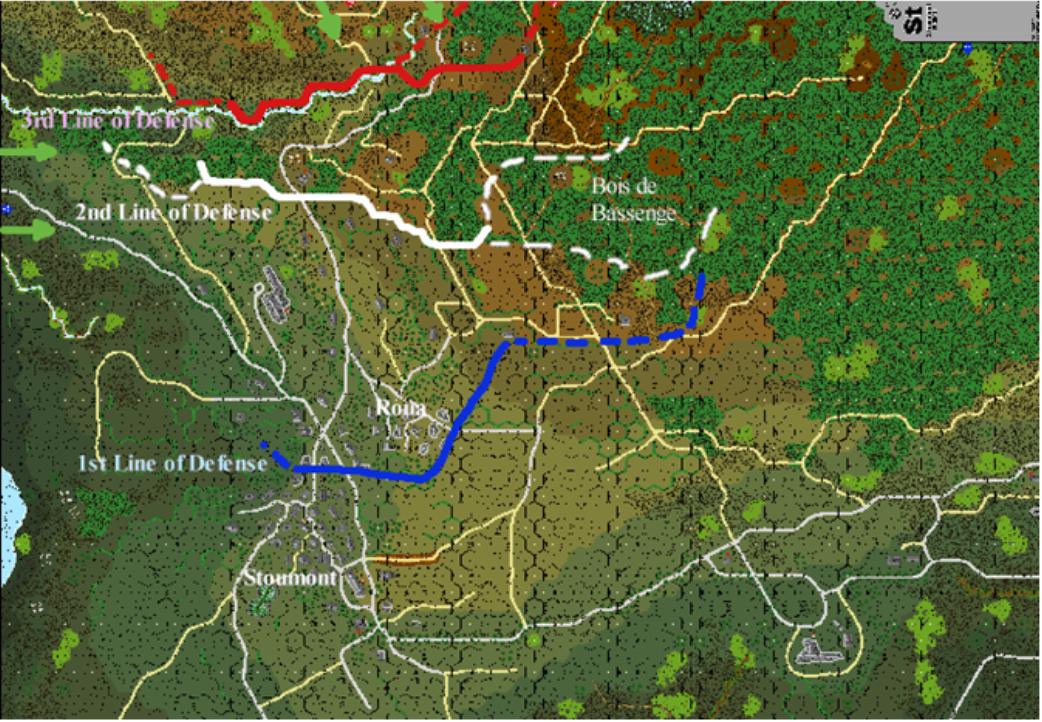
Figure-2 Clash at Stoumont: The Defense
(Click on image to expand it.)
Campaign Strategy
Playing a good defense through the first day is important but at least as much importance should be given to planning an overall campaign strategy. The American really has two choices in this regard. After fighting for survival through the first day, the American can either (1) wait and take the time to gather together the largest American force possible for the purpose of making a single massive assault geared to taking the sanitarium (using idle dates as necessary), or (2) press the attack straight through for the purpose of keeping up the attrition and never giving the German a chance to rest or bolster their forces and defenses with the bounty of an idle date. With only five American attack chits you will probably have to allow for an idle date at some point so the difference between (1) and (2) really comes down to whether you take the idle date sooner or later (see the attack chit placements in Table-1). The condition and positions of the opposing armies at the beginning of 20AM will influence this choice. Both approaches have their pros and cons and I personally have won games using either. On a comparative balance sheet and with my personal experience, I would have to give the nod to the second option, don't give the Germans a moments rest.
Objective Hexes & Strategic Locations
As the American don’t place objective hexes to help yourself for the moment while helping the capturing German for a whole game. In the Appendices I have shown three strategies for objective hexes that will help. The two versions up in the Northwest woods are interchangeable depending on how you would like to play it but the one in the Bois de Bassenge is closely tied to a Hill Defense Strategy. The later gives you access to the Chateaux de Froidcour, the Ste Anne Chapel, Peiper’s headquarters, and the western approaches to Stoumont once you have them in your possession. The former gives you a good link between Task Force Jordan and Task Force Harrison and provides good defensive and attack positions opposite the Sanitarium. You will get more objective hexes along the way so choose the initial locations that best fit your strategy along the way because you can always fill in later. On another note, Entrenchments are a key part of all of this. Each one becomes a strategic location so don’t place them such that the Germans are happy in the end. One good tactic, especially if the German is keying in on known fortifications and avenues of attack, is to place single foxholes out of the way and out of sight (such as buried in a clump of forest out of eyesight). At the end of the scenario these positions become your own setup area in maybe some of the most annoying places for the German. Ploys like this can give you jumping off points the German wished you didn’t have.
Blocking Traffic
Slowing down the Germans is critical. I have already talked about roadblocks as the most important fortification and I have given the best locations for them in the Appendices. Another important ploy involves taking advantage of the narrow forest roads and narrow city streets. Remember that all forest dirt roads are single lane (SSR KGP7) as are narrow city streets (P5.11). A regular sized vehicle immobilized, destroyed, or otherwise sitting in motion in one of these hexes will block traffic (regular refers to anything but double small vehicles like jeeps and kublewagons). The German has a tremendous advantage in vehicles and more than anything you will see dozens of German half tracks being used expendably to get behind you to induce failure-to-rout, crews jumping out to take important buildings, firing for encirclement, and other nasty things. It’s a very serious threat. Block the roads whenever you can. I always employ at least four roadblocks if not five and do what I can with my vehicles. After taking the MG out of the American M4 Tractor it becomes the perfect roadblock (see the appendices). In the 19N I have bought 1-1/2 ton trucks not only to open up the Task Force Jordan entry area up in the north early (and at no additional early-entry cost) but also to run up the forest roads to block them. If they get destroyed back there then it most likely will illuminate the Germans. Do the same to help yourself when you can. You might even want to consider buying them in the initial scenario to block roads (just don’t stop them and let them get captured).
Advantage in the Mist
Most of the advantage is with the attacking Germans but the American can gain advantage as well. Dummy infantry and perhaps more surprisingly dummy guns up front slow the German down. Place an otherwise useless unit up front like an SMC Jeep to strip concealment (just don’t forget that motion attempt if the German gets close; you don’t want to get captured: D2.401). That jeep will prevent the German from running up against real units with their concealment intact. Also, attack the German with machine guns and let the fire lanes fly. Mist has no effect on them and it might be the most advantageous thing the game gives you tactically. Examples are a 50. Cal HMG in W26 laying one out to W37, another in T26 laying one out to N35, and maybe an MMG in H21 laying another out to H28. In later scenarios an HMG in EE12 with a fire lane to O20 would be beneficial. There are others. Pick your own. The Fire Lane rule was an order of magnitude better for the Americans when Peiper was published but the ASL 2nd Edition is the one in effect.
The Battle
The Americans want close combat, especially if the Germans are foolish enough to use Fanaticism on the first turn (the Germans aren’t initially in a particular hurry and Fanaticism will be more dearly needed later). Anyway, keep some kind of concealment around even if it is just a leader. Use white phosphorous liberally during any fire phase whether it be from Mortars, Bazookas, or Infantry. Multi-hex buildings have basements, if a German tries to crash his AFV into one (the sanitarium for example) roll and see if it crashes through and dies. At this point in the game it's a free for all and I wish you the best.
Counter Attack
The best avenue of attack against the sanitarium is from up-hill and from the northeast thus another reason for the recommended lines of defense described above. It puts you in a position to do so. Attacking from the western Task Force Harrison area is up-hill across open terrain and through mine infested areas subject to German crossfire from above. Attacking from uphill in the Northeast with all those orchards in the way gives better terrain and eliminates most any FFMO DRM. Use armor, artillery, mortar WP, and infantry smoke whenever you can and cascade downward to secure the Sanitarium. You will have better results this way.
Night Fighting
Night Fighting skills are important in this game; learn them well. The Germans will most probably use attack chits in both night scenarios to avoid being pinned down without the ability to attack and move. The Americans will most probably follow suit for the same reason unless on 19N they have so few units/areas to defend that an attack chit makes no sense. While getting some free goodies as the defender, the defender will still be at the disadvantage due to movement restrictions. Overall I would say that the American has the advantage at night. There will be a lot of potential for close combat. Vehicles are hindered especially when the NVR is zero, and the German has nothing as good as the American Mortars for throwing up light when it is needed. In general the American will throw up all the light they can during the German turn but be very selective on their own turn. Don't throw up light everywhere during prep fire and then run out into it during movement. It's a good way to get killed. Read the night LV DRM rule closely and make sure you understand that being in a hex with terrain one or more levels higher than the FIRER will take away the DRM benefit. Thus avoid bypassing a woods hex when the enemy is at your own level. Look to find other paths that maximize your positive DRMs. Also look closely at the straying rules and try to stick close to creeks, roads, and out-of-sight illuminated areas. Movement factors through concealment at night are penalized which should help the American especially if they are defending the northern creek-line on 19N. Fire groups are illegal at night. Loss by failure to Rout doesn’t exist and all broken units must low crawl rather than rout normally. Finally, cloaking is a great luxury and in KGP it’s not just for units starting off map. Don't throw it away thinking that it is nothing more than a fancy concealment. It allows you to move quickly even while carrying a heavy load, allows you to haul ass through concealment terrain, hides the strength of the unit(s), and has other benefits. Also note that night is the only time it can rain in Stoumont.
I have some more recommendations that will help in the form of dirty tricks and favorite hexes. The rules notes are also important. These are the subject of the next few sections.
Dirty Tricks [top]
Ten of my favorites in descending order:
-
Jeep Assault Running down the X36 Trails with loaded jeeps can make the Germans jump out of their britches. I did this one game and captured the Chateaux de Froidcour on 19AM. The attacking German didn’t realize the trails could be used as a road by the jeeps and was turned for a 180. The result stuck. A win? Sure. But don’t expect a stunt like that to work every time. But then again... See SSR KGP7 for the rule.
-
Blitz From The Woods Another tactic to take the Chateaux de Froidcour. On this second occasion I ran and armored assault group of half-tracks, tanks, and infantry down the CC42 road on 20AM with the same objective in mind. I was stopped short at L42 by a hidden flame thrower manned by Doyle Motes, without that the Froidcour would have been in my hands. The territory I gained was still invaluable for victory. The point of this assault is a lightening strike that can net you 12 LVPs or more while capturing valuable rear-area territory. Keep in mind your initial 19AM foxhole placement; if they are captured and are too close to this avenue you’ll find this option taken away before you can even consider it.
-
Double Bombardment Purchase a bombardment while idle and another immediately thereafter prior to the attack. The first one comes down breaking units and the second one comes down inducing casualty reductions. Be careful you don’t rubble your LVPs.
-
Cutting off the Germans This one’s tough to pull off but worth mentioning if you are feeling fortunate. I came within one foxhole of accomplishing this on 20PM just before the German 50 point night turn. What I’m talking about is cutting off the German entry area. It’s way better than capturing it. The attempt started with a Hill Defense and a 20AM attack described above in item [2]. My American lines extended well to the east. Had I linked my setup area to the edge of the board such that the grey German entry arrow was isolated, the Germans on the next turn would have been forced to place all 50 points along the Eastern edge of the map with no chance of reinforcing the sanitarium and virtually no chance of using those units during that night turn. I just missed. Damn. Maybe you will get luckier.
-
Night Time Surprise Hidden initial placement half-squads in the northern creek at night where the German didn’t want to tread. Thinking they had secured the area the Germans moved on and the hidden Americans jumped out at the end to claim Objective/Strategic Locations. Just smile when you hear the German scream, “What!?!”
-
Foxhole Sleaze Purchasing foxholes tucked over there in out of the way places. If they can’t be seen then they don’t appear; until the end that is when they can affect setup area placement. I already mentioned this in General and Specific Strategy and Tactics but it’s a good way of sneakily expanding your lines.
-
Dummy Cloaking Cloaking at night is lost only when moving in the light or upon entry of an enemy occupied hex. Use a single dummy at the cost of only 1 FPP and give it the allowed cloaking. Use it to scout ahead, find mines, draw snipers, and whatever. Nighttime dummies have the advantage over daytime dummies in a lot of ways.
-
Trucks to the Rescue Bring in 1-1/2 ton trucks from the TT19 entry area on 19N at no extra cost to open up the entry area. This allows retreat there if need be, enables blockage of critical one-lane roads with the vehicles, and can create burning trucks at night behind the German front line (advantage American).
-
Tunneling to the Sanitarium Placement of Trenches leading up to the sanitarium on 19PM before the Americans are forced to retreat. Those trenches will still be there when the American returns and the German would wish there was some way to fill them in as they look to the Sanitarium’s defense. Mines don’t exist inside a trench and Americans advancing along them get the TEM benefit and have no concern for FFMO. It’s a relative red carpet to the sanitarium compared to the alternative. But it’s expensive so you have to balance considerations.
-
Destruction of the Victory Locations I'd like to see this outlawed. Germans detonating Demo Charges or bringing down artillery to rubble sanitarium, Chateaux, or church hexes and reducing the number of available LVPs. If the sanitarium is only worth 10 points the American will kick the closest cat. Hopefully a fuzzy stuffed one. It’s just not cricket.
Favorite Hexes [top]
Again, ten of my favorites in descending order:
-
W25 My very favorite. I killed three Panthers and a King Tiger with a single 57L from here. Great ambush Hex. An Orchard/concealment hex with barbed wire and hedges that is on the path to nowhere. The Germans need to pass close by but have virtually no reason to want to go through the hex itself. I recommend a 57L for rate of fire and because you might be twisting and turning a bit as you shoot up the German army. Woooo Hoooooo
-
OO23 Great defensive hex when defending the river line. I recommend a double foxhole, the best MG you can find and hopefully a bazooka or more if you have them. Two green units with a leader would man the location just fine if you’re running short of good troops. This location is hard for the German to zero in on unless he moves adjacent at which point he gets peppered, bazooka’d, and/or more of the same: break, die, break. It really holds up the German in what is your last on-board defensive line. And it has good route paths if you need them. Use this hex.
-
Z33 Wonderful location for the flame-throwing Sherman. Facing a German avenue of attack, it can’t be fired on or even seen due to Plateau until something is adjacent. With a flame thrower that’s where you want them. Flame them and pop the gun off at point blank range a few times. 16-point machine gun shots. Infantry in the adjacent house can make this a very tough position for the Germans to take and you should bag some good casualties here. And if you’re lucky you might even escape up the woods road after some success.
-
O22 A great mortar hex. A squad with two Mortars under a 1S Foxhole. Enemy from the east, enemy from the west, and swing it all the way down and around. How many times and how many ways can you spell WP? It has such a good angle on so many good hexes. Get ‘em.
-
BB29 Another good mortar hex. Same thing as above but maybe a 2S foxhole to fit in a bazooka HS. It’s effective if your playing a defense that could use the help.
-
V26 An imposing 90L hex right down the throat of where the German wants to go. It can engage Germans fronting the position or making an attempt against Roua. I hope your gun doesn’t break right off the bat as mine has done two out of two in that position.
-
W26 A great fire lane straight east if you ever get the shot. It would protect the whole approach to the hill.
-
T26 Another great fire lane firing Southeast. You probably will get this shot off. Hope a German armor unit closes to R29 and you can impact all of the German infantry coming out of the woods to the East.
-
Q21 Not sure what to say about this avenue of hex(es) starting here, except that the Germans can take advantage and turn it into a threatening northwest avenue of attack to the sanitarium.. About all you can do is put a gun here and mine it. In all the games I have played it has never been as important as it could have been but the next game will probably be the one that bites me. Guard this area.
-
KK16 A bad hex for the Americans. A Panther sitting up here facing LL14 and/or MM16 can scour the whole valley and can put a hurting on any units defending along the river if you have any. Don’t mention it and maybe the Germans won’t notice.
Rules Notes [top]
-
Units starting play in a setup area, including those just purchased, can set up dismounted, abandoned, and/or with any/all of its armament removed. Peiper CG9 on page P7.
-
Onboard setup: Vehicles cannot set up over stacked and must begin Stopped. A 2.9
-
CX infantry cannot cross the inherent barbed wire fences shown on the KGP map! P3.2
-
Vehicles can’t traverse combined crest/slope hexsides (the one exception shouldn’t matter). This limits the Germans in many areas and is very important in the grand scheme of American things. Don’t forget this rule. P2.53
-
Vehicles cannot enter sunken roads except via a road hex. B4.42
-
Squads can’t set up MMGs or HMGs in crest status. B20.95
-
Extra Heavy and Very Heavy Mist is equivalent to smoke in that it negates FFMO and Interdiction. KGP SSR3
-
There is no mist modifier when firing internal to a building (i.e. inside the sanitarium to an adjacent position inside the Sanitarium) E3.8.
-
Double small vehicles (jeeps, kublewagons, etc.) can use trails as if they were one-lane roads. SSR KGP7
-
Forest roads are one-lane. So are narrow village roads and sunken lanes. A destroyed or immobilized vehicle in any of these prevents vehicular movement in either direction except double small vehicles. B6.431
-
Mines can be set up in the shallow streams the Stoumont Map has (i.e. they are not water obstacles). B28.1
-
A hindrance accumulation of +6 blocks line of sight completely. This is important in Stoumont. B.10
-
Motion status vehicles cannot hold infantry in melee. A 11.7
-
Advancing fire with assault fire bonus ROUNDS UP, thus American 2nd line Infantry fire on the four table in advance fire at normal ranges. A7.36
-
Infantry can CC vehicles in their own hex even if they weren’t over-run. If you can kill the local vehicle you can fire at the next one in line. Again, important in Peiper. D7.2.
-
Night rules: No fire groups at night. E1.75 Sniper increased by +2 at night. E1.72
-
Steeples can only accommodate 1/2 squads or less. B31.21
-
Gas rules will have minimal effect on the game but remember to roll gas for vehicle covered arc changes. Also remember that changing TCA has a +1 or more penalty when out of gas. SSR KGP13.
-
Low ammo will have more effect than gas rules even though low ammo rolls start at 12. An eight (8) results in German low ammo on 21PM and it scales down evenly in between. P8.618
-
Reconnaissance. The American will probably want it at least once and probably forget it at least once. It’s the last thing in the purchase sequence; AFTER all units have been bought. P8.6222.
-
Gun pits: The +2 TEM for a gun pit can be used only by crews (not squads or half squads) and the gun pit ceases to exist if the gun is destroyed. C11.3
-
The U.S. Tractor should have a 4FP AAMG MA using the 12.7mm To Kill number with "2" ROF per U.S. Multi-Applicable Vehicle Note O, and its overhead depiction should not be printed on a white background. ASL Journal #1, page 62.
-
U.S. M3MMG/HMG Half-Tracks: Passenger(s) may Remove its secondary AAMG either as a dm MMG for the M3(MMG) or dm HMG for the M3(HMG). The MA of either AFV may be removed (but only as per D6.631) as a dm .50-cal HMG." 1996 ASL Annual.
Wrap-Up & Summary [top]
American success in this campaign depends upon:
-
Continual attrition of the German force including significant German loss on the first morning,
-
Holding together a competent force (counting reinforcements) during the ensuing retreat,
-
American on-board forces holding a final line of defense,
-
American conduct of territory grabbing missions that stretch the German defensive lines, and
-
The conduct of a focused and successful counterattack against a weakened German geared to capturing the required LVPs, geared to automatic victory, or both.
In pursuing these aims don’t be shy about paying extra for on map setup to hold up the integrity of on-map forces. It’s no good to be penny wise and pound foolish as the Cavalry arrives just to find Custer and everyone else dead. Also, don't underestimate the value of a dead German half-track. Take the shot. The German can easily obtain over 30 half-tracks through the course of the game and they have the penchant for being numerous, expendable, and dangerous. The German will repeatedly use them to conduct reconnaissance, enter American hexes to ‘freeze’ fire, and get behind the lines to prevent route. Do yourself a favor, put them on your initial ‘hit-list’ and start killing them early and often.
Regarding attrition, a 1.75 ratio of dead American/German Infantry is the upper threshold the Americans can bear over a sustained campaign. Somewhere closer to 1.25 is more comfortable and less stressful. Good luck in your campaign.
If you feel any of the advice, tips, points, rules, or anything else in this
write up could be improved on, are in error, or whatever else might come to mind, feel free to e-mail me at
LegionKid@aol.com. I certainly welcome feedback.
Phil Swanson
Houston Texas